How To Use Rufus To Make Install Windows 11 While Skipping Over Certain Requirements
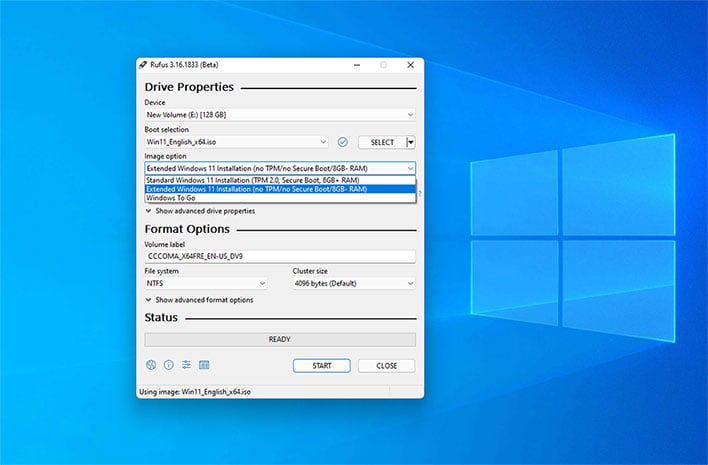
The developer of Rufus recently published version 3.16 beta 2, and with the latest beta build comes a new Windows 11 "Extended" installation option. According to the release notes, enabling this option disables checks for TPM 2.0 and Secure Boot support, as well as perhaps the RAM requirements.
We're not real clear on the RAM part, because the utility claims Windows 11 requires 8GB of RAM, whereas Microsoft lists 4GB of RAM. In all reality, 8GB is a good baseline for running Windows, and going under 4GB is likely a recipe for frustration. In any event, the option is there to bypass the check.
Click to Enlarge
Keep in mind that beta software is not always stable. That said, we didn't have any trouble with the latest Rufus beta, but of course your mileage will vary. In any event, here are the steps...
Whatever you had on your USB flash drive prior to doing this will be lost forever (barring a successful run with an undelete utility), so absolutely make sure you follow the very first step (back it up!).
This is a fairly quick process, minus however long it takes to download the Windows ISO from Microsoft. After clicking the Start button, it took around a minute to complete on our system with an older Toshiba 128Gb EX II flash drive.
Click to Enlarge
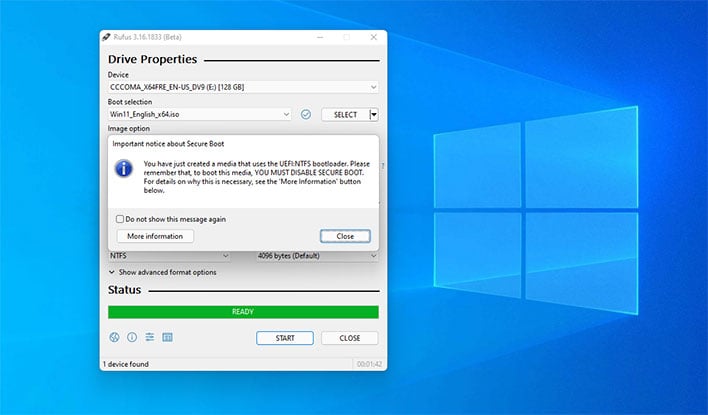
One additional word of warning—after it's finished, Rufus warns that you need to disable Secure Boot, if applicable, in order to install Windows 11 from your newly created media. The developer says that's not because the bootloader is unsafe, but only because Microsoft "has unilaterally decided, for no reason that stands the test of scrutiny, that anything licensed under GPLfv3 cannot be signed for secure boot, ever."
So there you have it. Good luck!
The developer of Rufus recently published version 3.16 beta 2, and with the latest beta build comes a new Windows 11 "Extended" installation option. According to the release notes, enabling this option disables checks for TPM 2.0 and Secure Boot support, as well as perhaps the RAM requirements.
We're not real clear on the RAM part, because the utility claims Windows 11 requires 8GB of RAM, whereas Microsoft lists 4GB of RAM. In all reality, 8GB is a good baseline for running Windows, and going under 4GB is likely a recipe for frustration. In any event, the option is there to bypass the check.
Click to Enlarge
Keep in mind that beta software is not always stable. That said, we didn't have any trouble with the latest Rufus beta, but of course your mileage will vary. In any event, here are the steps...
- Back up any important data, which is something you should always do when upgrading your OS. That includes whatever is on the USB flash drive you intend to use, because it will be wiped if you proceed.
- Download Rufus 3.16 beta 2 from GitHub (or a later version if one is available).
- Download the Windows 11 Disk Image (ISO) from Microsoft's website.
- Plug a USB flash drive into your PC and run the Rufus utility.
- Choose your USB flash drive from the Device heading if it doesn't appear automatically.
- Under the Boot selection heading, choose the Disk or ISO image (please select) option, then click Select and choose the Windows 11 ISO you downloaded.
- Under the Image option heading, select Extended Windows 11 installation (no TPM/no Secure Boot/8GB- RAM) option.
- Leave everything else at their default selections and click Start to create your custom installation media.
Whatever you had on your USB flash drive prior to doing this will be lost forever (barring a successful run with an undelete utility), so absolutely make sure you follow the very first step (back it up!).
This is a fairly quick process, minus however long it takes to download the Windows ISO from Microsoft. After clicking the Start button, it took around a minute to complete on our system with an older Toshiba 128Gb EX II flash drive.
Click to Enlarge
One additional word of warning—after it's finished, Rufus warns that you need to disable Secure Boot, if applicable, in order to install Windows 11 from your newly created media. The developer says that's not because the bootloader is unsafe, but only because Microsoft "has unilaterally decided, for no reason that stands the test of scrutiny, that anything licensed under GPLfv3 cannot be signed for secure boot, ever."
So there you have it. Good luck!
